My family is like an RV pit-crew when it comes to setting up camp. Everyone from our 3 year old daughter to our 11 year old son have a job. What used to take us over an hour is now down to about 30 minutes.
Here’s our list:
- Secure your trailer
- Disconnect your tow vehicle from your trailer
- Connecting your utilities
- Mom and Dad’s list to setting up everything else needed for playing, cooking, and relaxing by the fire.
We used to never have our kids help us. There was less to worry about if they waited in the car. (Thanks to the Amish’s hardworking ways for setting us straight!)
After camping a bunch in Amish country, we kept seeing the Amish children working with smiles on their faces. So we decided to give the kids jobs for setting up camp. In hindsight, we probably should have been doing this all along. It’s been fun working side by side, teaching them, laughing and threatening to take away stuff if they don’t help. I like to think they appreciate the whole camping adventure a little bit more.
SETTING UP CAMP
If you don’t already, I highly recommend putting together a checklist for campground arrival and departure. Changing Gears has a plethora of these lists that you can download from their site.
Here is our personal checklist for setting up camp for our towable along with some tips we’ve learned along the way.
Securing your Trailer and Disconnecting your Tow Vehicle
At this point, double check all of your utilities are going to reach, your slide can deploy and that your awning can extend. Also, take a look at your surroundings to see if there are any other hazards to be concerned with like dead branches, leaning trees or noisy neighbors. These may be all be reason to relocate campsites.

- Secure your trailer wheels – We use X-Chock Stabilizers along with a pair of Camco wheel chocks.
- Disconnect your safety chains, umbilical cord and your trailer breakaway cable from your tow vehicle.
- Lower your tongue jack – Depending on the set up, I’ll either use a board or a few leveling blocks underneath the foot pad of the tongue jack.
- Disconnecting your weight distribution hitch – Hopefully you have one of these. I use the Anderson “no-sway” weight distribution hitch. I raise the tongue jack, taking the slack out of the chains. I pull the pin and clip and then slide off triangle plate.
- Disconnecting your trailer from your tow vehicle – Lower the tongue jack back down until you can safely unlock the trailer coupler lock. You can now raise the tongue jack back up until your trailer is disconnected from your tow vehicle. Make sure you have enough clearance between the trailer and the hitch. You can now pull away.
- Level the trailer from front to back – Using the tongue jack, bring the trailer up or down so the trailer is level front to back. We place a small T-Level and a box level on the center of the floor of the trailer.
- Remind my wife to put two beers in the freezer. This is really number one but I’m trying to hold on to some credibility.
- Secure stabilizing jacks – I use an impact drill to lower my jacks. Make sure you follow what your manufacturer recommends. Over-extending these jacks can cause damage to your RV. They are only meant to stabilize, not level your RV. I swapped out all four of our factory stabilizers to the Eaz-Lift 24″ RV Stabilizing Scissor Jacks. My 11 year old is busy setting up our stabilizing blocks while my daughter and I are disconnecting the trailer. He stacks them as needed based on how the trailer is sitting. If the back end is up high, he will put higher stacks in the back.

Hooking Up Utilities for your Towable
Electricity
Also known as “shore power.” I connect the electricity prior to disconnecting the truck. An old timer passed on this bit of wisdom to me: Why not use shore power to run the tongue jack as opposed to the battery?
- Turn the breaker off
- Plug in surge protector
- Flip breaker back on
- If all is well turn the breaker back off and then connect the power cable to the RV. Once connected, I flip the breaker back on. I don’t know the science behind shutting the breakers on and off but someone wise taught me this and it hasn’t failed us yet.

Water
My set up has five components. This is the order from spigot to RV.
- Water pressure regulator – I use this one from CAMCO. It’s nothing fancy. You can spend more money and get ones with a gauge that allow you to adjust the pressure. You never know what kind of pressure an RV park may have. These devices will keep high water pressure from blowing out your plumbing system.
- Flexible hose attachment – I don’t use this part 100% of the time. It just depends on how low the water spigot is compared to the ground. There have been times I need the flex in this hose to get our inline water filter to fit.
- Inline RV water filter – I would love to up our water filtering game at some point. For now we use the inline filter and filter our drinking water inside with a Brita Water Dispenser.
- Zero G RV/Marine Hose – Best hose ever! Who would think you could get so excited about a hose? I love this thing and we ended up with it by accident. On our very first camping trip, we had the standard 25’ white drinking water hose. This ended up being 5’ too short and my wife just so happened to have the Zero G she was going to return. The Zero G is drinking water safe and lead free. The Zero G hose doesn’t get kinked up, it’s easy to work with and it compacts nicely. The Zero G is on my must have lists of items.
- 90 degree elbow – I like the idea of “reducing the wear and tear” on the RV water inlet connection. Since I’m attaching and detaching the hose sometimes every 3 days, this attachment makes sense. I’d rather replace an overworked 90 degree elbow for under $4 than have to replace the actual water inlet on my RV. I leave this connected to the RV at all times.
- Before I connect the hose to the 90-degree elbow attached to the RV, I turn the water on and run the air out of the hose. I then shut the water off, connect the hose to the RV and turn the water back on. I check everything at the spigot and my connections for drips or leaks. I then go back to the RV and make sure the inlet isn’t leaking. Lastly, I find the nearest kid (one of my own) and tell them to let their mother know the water is on. It never fails, my child will then scream at the top of their lungs “MOM! THE WATER IS ON.”
Sewer
I have one container for all my black tank supplies. Sewer hoses, black tank flush hose, and other attachments. It is usually at this point of setting up camp that all my helpers have vanished.

- Sidewinder RV sewer hose support – This is used to control the direction of the sewer hose and to assist gravity. I’ve been to plenty of sites where the sewer line is uphill. And we all know the stuff in your black tank rolls downhill. The sidewinder also supports and stabilizes the hose which is critical when you first open your tanks.
- How much hose? Typically I’m good with our 15’ section but if not, I may have to connect two together to reach. Make sure you have enough hose for your camping adventures. I have about 30’ of hose between three different hoses. I try to keep this out of site and under where the slide is going to be.
- Secure the elbow to the sewer drain – I’m never comfortable just having the elbow rest on the sewer. Some places you use a rock to hold the elbow down. All those hours I spent playing Tetris as a kid did not go to waste. Other locations you can screw your elbow into the sewer drain.
- Double check everything one more time to make sure nothing came loose. When attaching RV sewer hoses to your RV or together they should seal tight. If not, double check the seal didn’t fall out. Ask me how I know?
MOM AND DAD’S LIST FOR SETTING UP CAMP
We found the most efficient way to finish up the setting up camp is to split up once we are parked and leveled side to side. While I’m setting up the utilities outside my wife is busy inside making the RV livable again. Most of these items are non-critical other than opening the door and deploying the slide. If the weather is bad outside we may hold off on completing the outside items until the weather clears up.
| Action Item | Mom (Inside) | Dad (Outside) | Kids (Helping) |
|---|---|---|---|
| Deploy Steps | X | X | |
| Unlock Front Door & Storage Compartments | X | X | X |
| Put Beers in Fridge | X | (Remind Mom!) | |
| Deploy Slide | Mom helps a kid push the extend button | Dad is spotting to ensure we don’t hit anything | The little ones love pushing the button! |
| Replace Tongue Jack Cover | X | X | |
| Turn Fridge/Freezer On | X | X | |
| Turn On Water Heater (Electric Mode) | X | X | |
| Open Propane Valves | X | ||
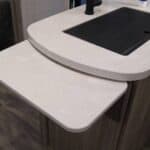
| Set Up Counter (Coffee Maker, Plants, Water Pitcher, Air Purifier, Hand Soap, Dish Soap and Dehumidifier) | X | X | |
| Fill up Dog Bowls | X | X | |
| Turn On Heat, Fan or AC | X | ||
| Fill Black Tank with Some Water | X | X | |
| Put Rug Outside | X | X | |
| Setup Outside Table (Ice Maker and Blackstone Grill) | X | X | |
| Setup Camp Chairs | X | X | |
| Setup Screen House | X | X | |
| Get Kids’ Bikes and Helmets | X | X | |
| Get Adult’s Bikes (off Jack-It or Rear Receiver) | X | X | |
| Raise TV Antenna and Scan for Channels | X | ||
| Cheers! | X | X |
Remember those two beers in the freezer? It is now time to crack them open and cheer to a job well done. What did I miss?

Michael Huff
Full-time RVer, husband, father, son, brother, friend and dreamer. I am officially “living the dream:” traveling the country with my amazing wife, four awesome kids, and beloved boxer in our 150-sf RV. Each day we are learning, laughing, (maybe a little yelling) and finding the good in this world.