Fair warning! Modifying and upgrading your RV can become addictive. Before you know it, you’ll be installing lithium ion batteries, solar panels, shower heads, extendable awnings and painting all the cabinets a fresh shade of mauve.
If you’re new to the RV mod world, then here are a few easy-to-do RV mods for under $20 each. But once you try them, you’ll wonder how you ever go by without them!
1. INSTALL A 360 SIPHON VENT

Ever smell the inside of an RV waste or holding tank? It’ll singe your nose hairs and knock you flat on your rump. It’s some real next-level stank, and it’s the last odor you want in your living space.
That’s why RV sinks have P traps or HepVo valves. Unfortunately, if you have a P trap, water can slosh out or dry up, and the gates open wide for the stench to invade your living space.
The 360 siphon vent fume extractor is a clever piece of plastic that banishes these unpleasant odors. When you drive your rig down the road, the 360 vent creates an air vortex that sucks air up and out of the vent pipe system. Genius, eh?
Side benefit: This helps waste break down faster and reduces the need for tank odor chemicals.
Installation is easy. The Siphon 360 vent is compatible with 1-½ or 2-inch vent pipes.
- Remove the existing roof vent cover.
- Clean up any old caulk or sealant.
- If necessary, reduce the height of the PVC vent pipe using a hacksaw or pipe-cutter.
- Install the 360 vent using a butyl tape gasket and the provided screws.
- Cover the flange and screw heads with self-leveling sealant.
2. COMMAND BATHROOM HOOKS AND STRIPS
Regular screws don’t hold well in RV walls, which are usually made of ⅛” thick lauan plywood or Azdel woven plastic paneling.
You can get away with installing an expanding or screw-in drywall anchor. But that’s a permanent unsightly hole in your wall, now.
Many RVers opt for adhesive-backed Command hooks and velcro strips. These bits of hardware have a 3M adhesive just strong enough to stick, just weak enough to release several months later. Most of the time, they won’t tear off wallpaper or destroy paint.
Here are some common uses for RV command hooks:
- Hold toiletries on your bathroom shower wall
- Store utensils on the inside of cabinet doors
- Hold plastic trash bags
- Place them sideways to hold toothbrushes or screwdrivers
- Glue them to the underside of an upper cabinet to hold mugs, spatulas or hand towels
For more ideas, visit this list from DIY RV.
3. TRUST A DOOR HOLDER
If your RV doesn’t come with a door holder, you’re just an accident waiting to happen.
Strong winds can slam the door open or shut. In severe cases, a door can slam backwards into a sidewall or window, causing hundreds or thousands of dollars in damage.
Some RV doors have friction hinges, where a piece of rubber resists the door turning. This doesn’t prevent accidents, but it does slow down the door and reduce the chances of severe damage.
There are two basic sorts of RV door holders.
- The first sort is a mechanical latch, like a classic T-holder latch. These latches must be manually set and released. But they are strong! So strong, in fact, that they can cause damage to your sidewall if they get pulled out.
- The second sort is more of a door stop or temporary holder, like a rubber plunger or a magnetic latch. These door holders engage automatically, but they won’t hold a door open in super strong winds.
One is not necessarily better than the other. If you want maximum security, choose a T-latch. If you want something that works every time, go with a rubber socket-and-plunger.
Check out this article about how to install an rv door holder.
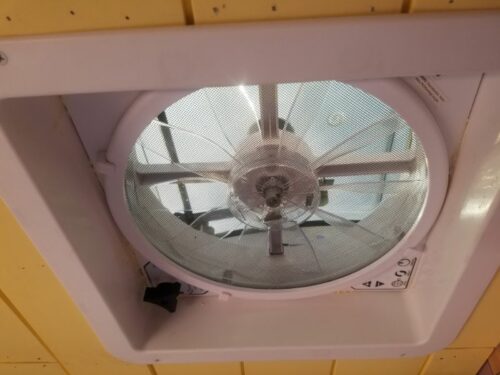
4. STICK-ON LED LIGHTS
Many parts of an RV are poorly lit, such as under the bed, inside storage compartments, and even around the kitchen. Or you might want some extra lumens to easily read a book at night.
Remedy the problem with stick-on battery-powered LED puck lights. These round lights can be placed anywhere, even upside down, and turn off and on with either the flick of a switch or a push of the lens.
Remember: Choose LED lights! These lights will last for thousands of hours, and you can get hundreds of hours with just a few batteries! Incandescent lights are cheaper but will drain batteries very quickly.
5. ADD AN ELECTRICAL OUTLET
RVs – especially older ones – really skimp on the outlets. Sometimes a 6-person dinette is serviced by just one outlet! Or a “His & Hers” bedroom layout has only one outlet (and sometimes, it’s not even in the middle).
Thankfully, adding an outlet isn’t too difficult. Although, since you’re working with electricity, it is quite dangerous! If you’re not experienced and careful, please leave this one to the experts. Please review the NFPA 1192 and NEC 2020 codes before proceeding.
You can add a 120V outlet, 12V outlet, or both! 120V outlets can charge regular household appliances; 12V outlets can charge phones, media players, etc.
Unfortunately, you can’t easily install an outlet anywhere in an RV. You need to be able to tap into a circuit. Your best bet is often underneath bed or seating areas or behind one of the kitchen drawers.
If you look in the corners of your underseat storage compartments, you’ll often see white or yellow Romex cable. Sometimes the wire runs through conduit. Once you obtain a wiring diagram of your unit, you can choose which circuit to tap into.
- If installing a 120V outlet, use an old-work junction box and a grounded, tamper-proof duplex 15A or 20A receptacle. GFCI protection is recommended and may be required near wet areas.
- If installing a 12V socket or USB outlet, best to use a Wago 221 lever connector to connect the wires.
6. USE A MATTRESS ENCASEMENT
The interior of an RV can easily hit 120 degrees in the summer and 0 degrees in the winter when stored outdoors.
In other words, your RV interior may, at different times, be either jungle or tundra, desert or forest. It invites creatures of any and all kinds to take up residence.
Plus, the extreme temperature and moisture swings can promote the growth of mold, mildew, and bacteria.
So you should protect the place you sleep. The best solution is a airflow system like the Froli Sleep System, but even if you don’t have money for that, spend $20 on a 6-sided mattress encasement.
A full encasement – not just a waterproof sheet – prevents condensation, bed bugs and everything else from infiltrating your mattress. It can be washed before and after long trips so you’re guaranteed a clean, peaceful sleep.
7. REPLACE YOUR ENTRY DOOR KEY CYLINDER

While replacing your stock RV entry door lock with an advanced keyless deadbolt door lock is a worthy investment, that’s more than $20!
A simpler solution is just to replace the key cylinder and key. Your key cylinder is not unique; in fact, thousands of other RVs probably share the exact same key!
Don’t make it too easy on the RV thieves. Upgrade your entry door lock core cylinder. By replacing this part, a knowledgeable thief can no longer ID your key simply by the make, model and year of your RV.
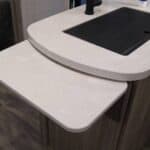
8. INSTALL A DUST PAN IN THE FLOOR
For some reason, most RV designers pay no attention to where you put your trash. There’s rarely any built-in space in an RV for a trash can.
Most people get away with a plastic bag hung on a hook somewhere and a miniature dustpan and broom.
But it’s impossible – no one can get that last irritating line of dust leftover from a dust pan. And in an RV, where the dust piles up by the minute, the problem is even worse.
Enter the Skampcan, a clever patented innovation from the heartland. A Skampcan is simply an enclosed box with a lid that recesses into your RV floor (or any worksurface). You sweep trash directly into the Skampcan, which can then be removed and dumped into a trash can.
To learn how to install a Skampcan in your RV, visit their website here.
Andy Herrick is a blogging nerd, #8 Enneagram, wannabe bread baker, INTJ, RV industry professional, and small business entrepreneur. He can be found hanging out with his lovely wife and family, skiing, cycling, climbing, hiking, and convincing anyone who will listen why dogs aren’t really that great of pets. Also, he runs this website.